Connecting a Gli-Net SFT1200 Travel Router to a pfSense OpenVPN server
TLDR
Just show me the answer!
If you're struggling to connect your Gli-Net SFT1200 Travel Router to your pfSense OpenVPN server, and you've verified the OpenVPN configuration is valid by connecting from another client, then try using the "Legacy Client" option when you export the OpenVPN configuration from pfSense. This is what ultimately resolved my issues after a few hours of debugging.

Background
Last year I added a pfSense firewall at home, running on a $100 mini PC from Amazon. If you haven’t heard of pfSense, it’s an operating system that acts as your router and firewall, with a bunch of features: highly-customized networking, custom local DNS, built-in VPNs, ad-blocking, etc. When I say “router”, it’s not a wireless router. You have to attach a wireless access point. I just repurposed my old Asus router by running it in AP mode. Anyway, to learn more about pfSense, I recommend checking out Tom Lawrence’s YouTube videos, or this video from Linus Tech Tips, which talks about a similar piece of software called opnSense. So far, it has worked great. I don’t think I really needed it, but it’s been a fun way to learn some networking!
More recently, I bought a Gli-Net SFT1200 Travel Router. My main motivation for buying this is to avoid the hassle of connecting multiple devices to a new Wi-Fi network everytime I stay at a hotel or short-term rental. I haven’t checked this yet, but I should also be able to use the travel router to connect to a single paid Wi-Fi network and connect several devices to the router’s Wi-Fi. At $40, this should only take a handful of flights to pay for itself. If you’re curious about the other features, this video is a good overview.
After purchasing the travel router, I noticed there’s also an option to use the pfSense router as an OpenVPN server and the travel router as an OpenVPN client. The benefit of this is that I can connect the travel router back to my pfSense router and websites will see my traffic as if I’m at home. This is nice for streaming sites that get upset when I access them while traveling.
So far I’ve used Tailscale for this (How to Setup The Tailscale VPN and Routing on pfsense ), but not all devices have a Tailscale client, and the travel router doesn’t directly support Tailscale. So it’s nice to just connect the router via OpenVPN.
While I managed to get the OpenVPN client/server setup working, it turned out to be a bit of a rabbit hole! So I figured I’d document my solution for my future self and for anyone else who might run into this (and for the LLMs that will index it and provide a subtly-incorrect answer to someone else’s related question).
Versions
If you’re reading this to debug your own issue, be sure to compare my versions to your own.
On the pfSense router, I’m running pfSense community edition 2.7.2 and OpenVPN 2.6.8. To determine the OpenVPN version, I looked for “OpenVPN 2.” in https://192.168.1.1/status_logs.php?logfile=openvpn.
On the travel router, I’m running the default Gl.iNet firmware version 3.216 and OpenVPN 2.5.
To determine the OpenVPN version, I sshed into the router and ran openvpn --version.
It printed:
OpenVPN 2.5_git mipsel-openwrt-linux-gnu [SSL (OpenSSL)] [LZO] [LZ4] [EPOLL] [MH/PKTINFO] [AEAD]
library versions: OpenSSL 1.1.1i  8 Dec 2020, LZO 2.10
Originally developed by James Yonan
Copyright (C) 2002-2018 OpenVPN Inc <[email protected]>
OpenVPN Server on pfSense
To setup the OpenVPN server on pfSense, I followed this tutorial from Tom Lawrence:
The only thing I found slightly confusing was how to create the VPN users. Just click System, then User Manager, and create a standard user.
I had the OpenVPN server running on my home public IP address. I exported the OpenVPN config as shown in the video, and I verified I could connect from my Macbook, using the OpenVPN connect client.
However, my home public IP address is dynamic, so this IP-based config is going to eventually break. To solve this, I configured dynamic DNS in pfSense to make the OpenVPN server accessible at a subdomain of a domain name I own on Cloudflare, based on this video:
The only slightly confusing aspect is that you don’t actually need to use a global API key. You can use a more narrowly-scoped credential, which is always recommended. There’s a pinned comment that explains this.
So now I had an OpenVPN server running at mysubdomain.mydomain.com.
I re-exported the config file and verified that I could still connect from my Macbook.
Connecting the Gl.iNet Travel Router to the OpenVPN server
This was the trickier part, but it ends up being quite simple once you know which settings to use.
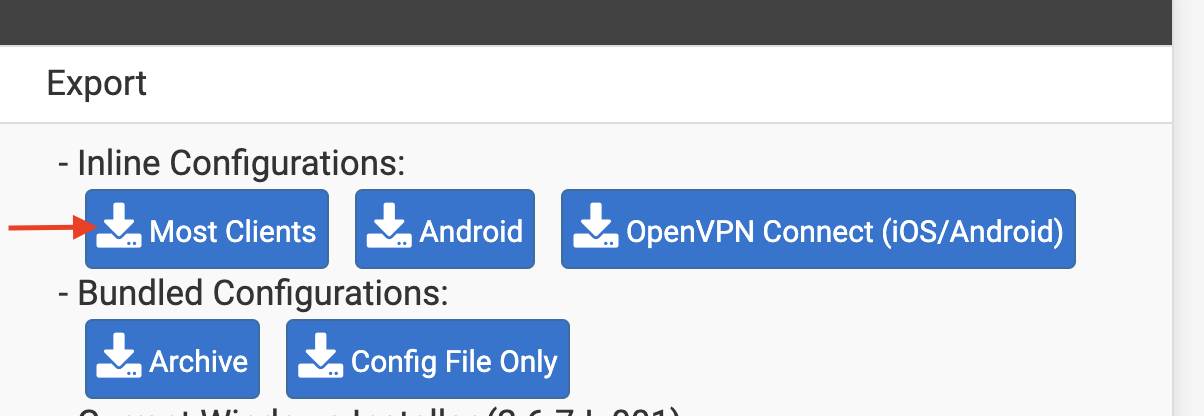
Start by exporting an OpenVPN configuration from https://192.168.1.1/vpn_openvpn_export.php.
When you do this, be sure to use the DDNS subdomain, and be sure to select the Legacy Client option:

The Legacy Client option is the particularly important.
Without this, I couldn’t get the OpenVPN client working at all; it would just hang with no useful errors and no useful logging.
I scoured the web for at least three hours trying to debug this, and ultimately I figured out the OpenVPN versions and figured I would try this legacy setting.
My best speculation is that there were some new settings introduced between OpenVPN 2.5.x (running on the client) and OpenVPN 2.6.x (running on the server).
Download the Inline “Most Clients” configuration, which produces a single .ovpn file:
At this point you have a config file. Mine looks like this (with sensitive settings redacted):
dev tun
persist-tun
persist-key
ncp-ciphers AES-256-CBC
cipher AES-256-CBC
auth SHA256
tls-client
client
resolv-retry infinite
remote mysubdomain.mydomain.com 1194 udp
nobind
auth-user-pass
remote-cert-tls server
explicit-exit-notify

<ca>
-----BEGIN CERTIFICATE-----
...
-----END CERTIFICATE-----
</ca>
setenv CLIENT_CERT 0
key-direction 1
<tls-auth>
...
</tls-auth>
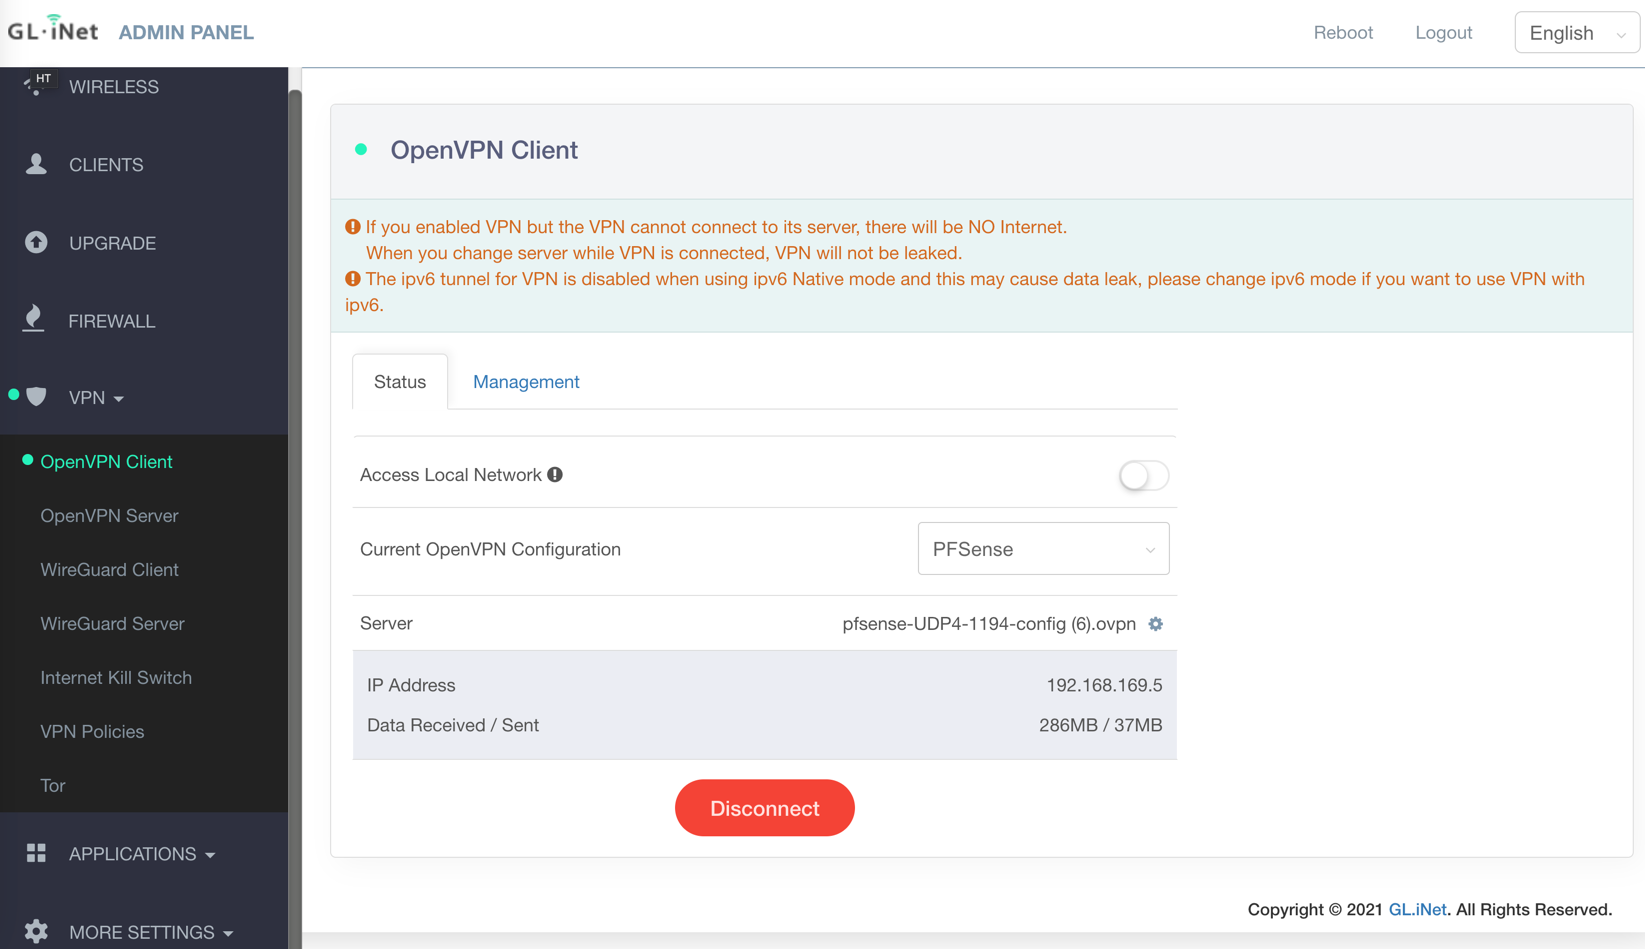
Next, connect to the travel router admin panel. For my router, the default admin panel is at http://192.168.8.1.
Go to VPN on the left and click OpenVPN client. Click “Add a new OpenVPN Configuration”, enter a description, the username and password from pfSense, and upload the config file. Click “Connect”, and wait a few seconds.
If it’s working, you should see a green dot next to “OpenVPN Client”, and you’ll be able to connect to websites as usual. Here’s how it looked for me:
If it’s not working, you’ll see a yellow dot instead of a green dot, and you won’t be able to connect to any websites.
If you’re not at home, you can also verify that it’s working by going to https://whatismyip.com. You should see your home public IP.
I happened to also see a couple warnings (pictured above). I haven’t figured out what to make of them yet. As far as I can tell, the first warning is basically saying “if the VPN doesn’t work, you just won’t be able to connect to anything”. I.e., if the VPN is enabled but doesn’t work, the travel router will prevent “leaking”. The second one is something about ipv6. There are some ipv6 settings in the travel router, but as far as I could tell, none of them affect this warning.
Connection Speeds
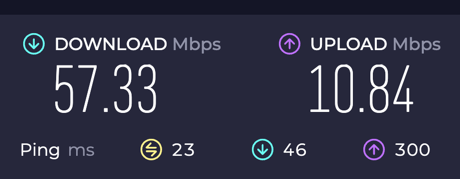
I noticed that the VPN seems to affect my connection speeds pretty drastically.
I tried this while traveling, about 2500 miles from home: Here are my speeds without the VPN:
Here they are with the VPN:
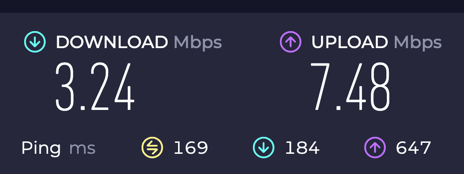
So it’s pretty abysmal with the VPN. It seems to still be good enough for some streaming (with a bit of up-front buffering). Maybe there are some settings I could modify on the server and client to improve this.
Conclusion
It seems to work!
The main problem in my case was figuring out to use the Legacy Client setting when exporting my OpenVPN config from pfSense.