My Homelab, September 2024 (TrueNAS, Proxmox, Tailscale, a 2014 Mac Mini, and more)
Background
This post is a tour of my homelab as of September 2024. Homelab, aka self-hosting, has been a hobby of mine for about 10 years now. I’ve gone through many iterations over the years, but my overall setup more-or-less stabilized about a year ago.
I’m writing this post with two goals in mind. First, to give other homelabers and self-hosters an idea or two. Second, to get some feedback and ideas about improvements that I could make.
My Homelab Requirements
I’ve designed and built my homelab with the following requirements in mind:
- My homelab should be a secure, long-term source-of-truth for all of my files and media. My storage consists of boring personal documents (projects, personal finances, ebooks, etc.), my own photos and videos, an archive of my family’s old photos and videos that I’ve digitized, and Timemachine backups of my and my fiancé’s Macbooks. Right now I’ve used up about 4TB of 12TB available storage, and I don’t anticipate expanding anytime soon.
- My homelab should securely host self-hosted web services that I find useful.
- My data and most of my services should be securely accessible remotely but not publicly.
- Some of my services should be securely accessible publicly.
- All data and services should be backed up in an automated fashion, following the 3-2-1 pattern.
- All services should be monitored 24x7 with alerts sent to my email if something is misbehaving.
- The hardware should be nearly silent, quiet enough to live in a bedroom.
- The setup should be relatively cost-efficient. Ideally I pay less than I would for similar cloud services.
Here are some notable non-requirements that often come up in homelab discussions:
- I don’t need a massive amount of storage for movies and TV shows, as I’m not really a movie and TV buff.
- I don’t need anything faster than gigabit speeds on my LAN. I dabbled with 2.5 gigabit hardware, kind-of got it working, but the benefits weren’t worth the cost and complexity. I think I’m happy to wait until 10 gigabit is the default.
Why Build a Homelab?
Getting my homelab to a state where it’s consistently useful and reliable has taken non-trivial effort. So I think it’s useful to briefly reflect on the pros and cons of building and maintaining a homelab.
Pros:
- Learning. I work in software, so many of the things I learn in my homelab are useful in my career, and vice-versa.
- Data privacy. All of my important data lives securely on my LAN, with no chance of being used to optimize my ads.
- Independence. I can host a service without worrying that a company is going to shut it down or hike prices.
- Cost (money). There comes a point where it’s actually cheaper to buy and run your own hardware.
Cons:
- Cost (time). It would be significantly less time-consuming to dump my data onto a cloud service, pay a monthly fee, and hope they don’t misuse it or lose it or shut down the service.
- Responsibility. It’s on me to ensure my data and services are secure and backed up.
I’m not a gardener, but I imagine building a homelab is like growing a vegetable garden. You could just go buy some vegetables at the store, but it’s also pretty cool and useful and enjoyable to do it yourself.
Hardware
Network Box
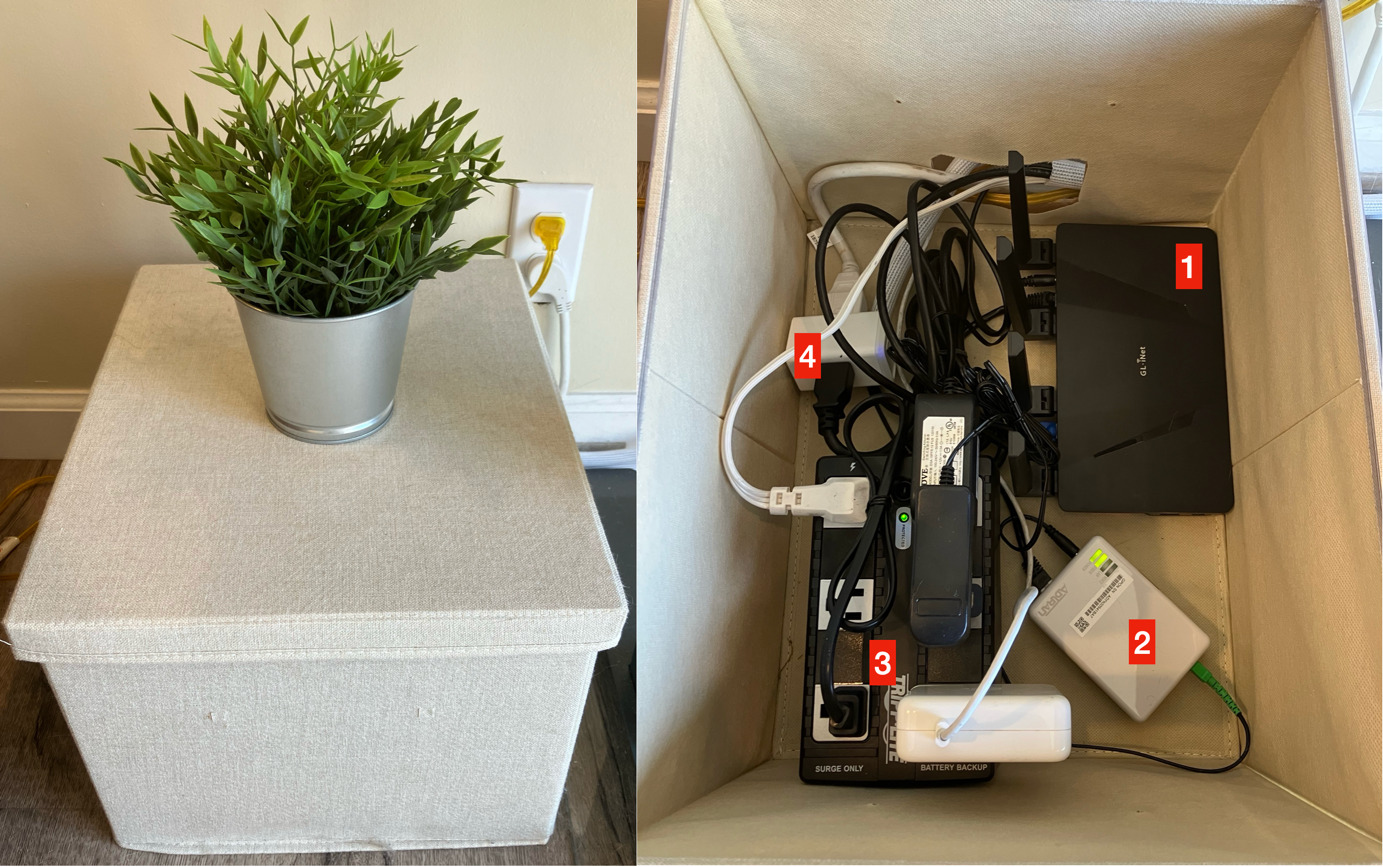
The majority of my networking hardware lives in a neutral-colored cloth filing cabinet next to my desk in my living room.
This is in my living room simply because that’s where the cable company decided to install the incoming fiber connection. If I remember correctly, I bought the box on Amazon for ~$15. I cut out a hole for cables and airflow. The cables are a bit messy, but it doesn’t bother me as it’s covered up. The fake Ikea plant is strategically duct-taped to the top of the box to prevent our two cats from sleeping on it and cratering the lid.
The components as numbered are:
- GL.iNet GL-AX1800 Flint router (Amazon).
- Fiber modem provided by my ISP. I get gigabit up and down for ~$70/month.
- 350VA Trip Lite UPS (Amazon). Probably overkill, but it keeps things running during occasional power interruptions.
- TP-Link smart plug with power monitoring (Amazon).
According to the smart plug, the router and modem run at about 10W.
Compute and Storage Cabinet
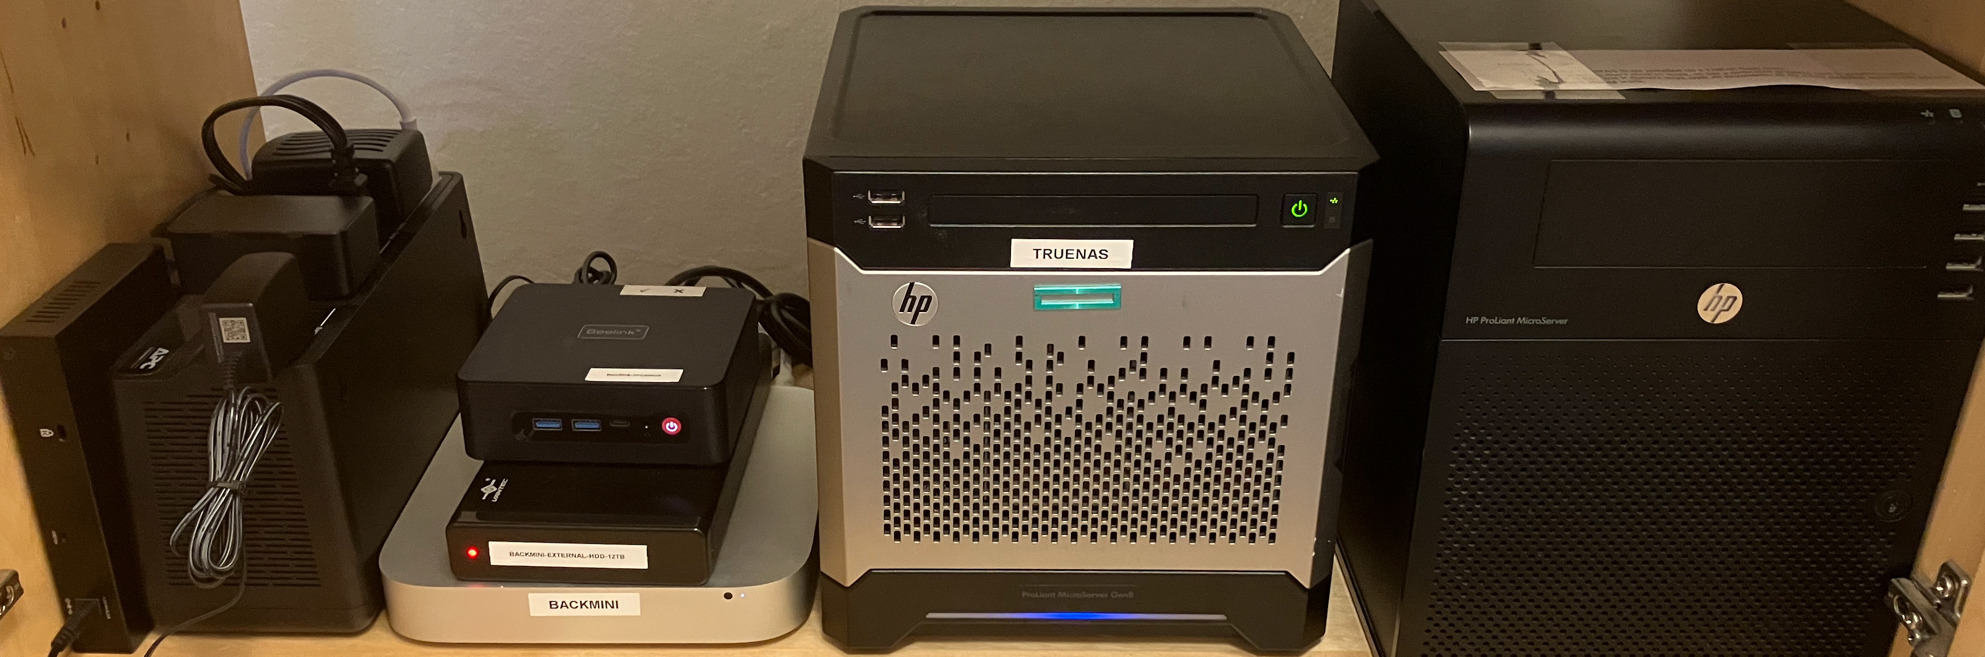
All of my compute and storage lives in an Ikea file cabinet in our guest bedroom.
I purchased the cabinet on Craigslist for around $50. I believe the line is called Galant, but I’m not totally sure, and I can’t find the exact model online. The bottom half has a door that slides out with arms for mounting file hangers; I just use it to store spare hardware. The upper half is pictured and opens with standard swinging cabinet doors. I keep these doors closed, so I just removed the back panel on the top half for cabling and airflow.
The components as numbered are:
- 8-port gigabit network switch (Amazon). This is connected to my router via ~40 feet of Cat6 cable running out of my living room, around the building, and through the guest bedroom wall.
- APC 425VA UPS (Amazon). Last I checked, it can keep everything running for about 15 minutes. The main purpose is just to handle occasional power interruptions.
- 2014 Mac Mini, purchased for ~$100 on eBay, used for backups. It has an Intel i5, a 250GB NVME, and a 1TB HDD and idles at about 10W.
- Seagate IronWolf 12TB Hard Drive (Amazon) in a cheap USB 3.0 enclosure, attached to the Mac Mini. This idles at about 5W.
- Beelink Mini S12 Pro (Amazon), running Proxmox with an Ubuntu Server VM for all of my self-hosted services. It has an Intel N100, 16GB RAM, a 500GB NVME SSD, and 2TB 2.5” SSD and idles at about 5W.
- HP Proliant Microserver Gen8, purchased for ~$150 on eBay, running Truenas Core. This has a Xeon E3-1220L CPU, 16GB DDR3 ECC memory, and four 4TB Seagate IronWolf NAS Drives (Amazon) and idles at about 40W.
- HP Proliant Microserver Gen7, purchased for ~$50 on Craigslist, used as a test-bench for trying new operating systems and services. This has an AMD Turion II Neo N40L CPU, 16GB DDR3 ECC memory, and three 2TB drives. It’s powered off unless I’m using it to test something.
Networking
Tailscale
I use Tailscale to make services accessible remotely but not publicly.
Tailscale is essentially a mesh VPN that enables secure peer-to-peer communication between services and clients on a Tailnet. I have the Tailscale client on my Macbook, iPhone, and iPad, which lets me access any of the Tailscale-enabled services that I host. For more details, I wrote a post: Accessing Docker Compose applications via Tailscale with HTTPS (TLS).
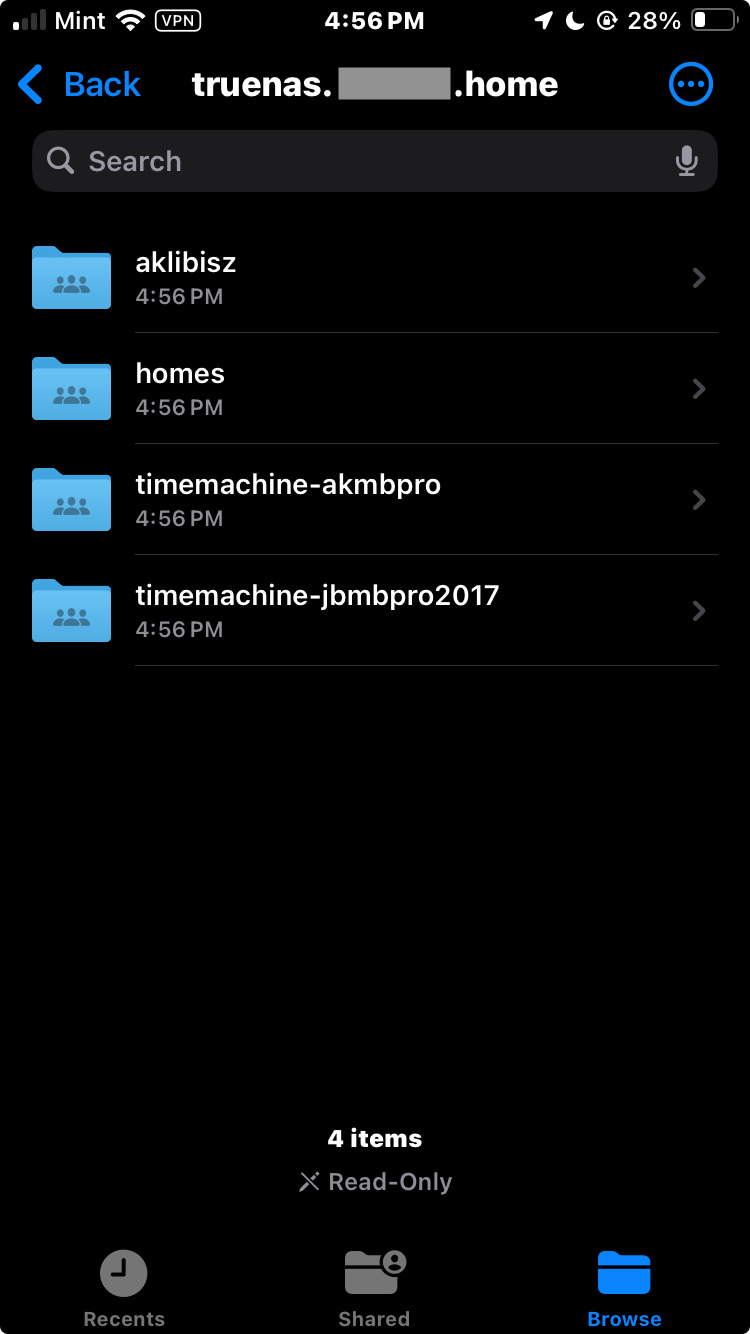
For services that don’t have a native Tailscale client, I use my router as a subnet router. For example, this lets me access my TrueNAS server remotely from my iPhone via the Files app:
GL.iNet GL-AX1800 Router
I use this router for all networking at home. I picked this router because it runs OpenWRT and supports Tailscale.
I have the router connected to my Tailnet, which lets me remotely administer the router. I’ve configured it as a subnet router, which lets me access other IPs on my LAN that can’t connect natively to Tailscale. I’ve also configured it as an exit node, which lets me route traffic through my home router while I’m traveling.
Overall it’s a great piece of hardware for the price. I ended up buying and installing the same router for my parents, and configured it similarly. This makes it easier to be the IT guy from across the country.
Cloudflare Tunnels
I use Cloudflare Tunnels for any services that need to be accessible via domain name on the public Internet.
A Cloudflare Tunnel amounts to running a Cloudflare client on a server.
The client establishes a secure tunnel between the server and the Cloudflare infrastructure.
You configure the tunnel to proxy traffic between a domain or subdomain you own and a specific application on the server.
For example, I could configure https://foo.alexklibisz.com to proxy traffic to http://localhost:8080 on my server.
I typically run the Cloudflare client as a Docker container in a Docker Compose application, proxying traffic to and from the service container.
Tunnels automatically include free TLS and some DDOS protection and analytics from Cloudflare. Another great feature is the ability to configure additional layers of security for a service. For example, I can configure an allow-list of emails for a service, and Cloudflare will prompt anyone visiting that service to enter an email and authenticate with a token before proceeding to the service. If the visitor isn’t on the allow-list, they don’t get a token and can’t access the service.
Tunnels are by far the simplest way I’ve found to securely expose a self-hosted service on the Internet.
Services
TrueNAS Core
I run TrueNAS Core on the Microserver Gen8. I have four 4TB disks in RaidZ1, meaning I have ~12TB of usable storage and can recover from up to one disk failure.
I use TrueNAS for two main purposes:
- As a file server, accessed via SMB from my Macbook, iPhone, and iPad and from some of my self-hosted services.
- As a backup server for Timemachine backups from my and my fiancé’s Macbooks.
I’ve made TrueNAS accessible on my Tailnet by configuring my router as a subnet router. I run a nightly backup via Rsync to my Mac Mini, which gets backed up to Backblaze. I’ll describe that more below.
Proxmox
I run Proxmox Virtual Environment on the Beelink Mini PC. Right now I run a single “production” Ubuntu Server VM for all of my self-hosted services and some temporary other VMs for testing and learning. I run services on the Ubuntu Server VM via Docker Compose, and I access them via Tailscale or Cloudflare Tunnels.
I used to just run Ubuntu Server directly on the mini PC, but I recently added Proxmox to unlock a few nice features. I can create new VMs to experiment with new operating systems and services without affecting the “production” VM. It’s also much simpler to backup the production VM in an automated fashion.
Cusdis
Cusdis is a very basic comment system for websites. I run the Cusdis server for this website as a Docker Compose application on my Ubuntu Server VM, exposed to the Internet using a Cloudflare Tunnels container.
I originally tried to run Cusdis on a Hetzner VM, but I ran into trouble getting email notifications to work. It turns out Hetzner blocks email traffic by default, and I was never able to get my support ticket for unblocking this to go through. Running it locally has been totally sufficient.
Firefly
Firefly-III is a personal finance manager with features similar to Mint.com. I run the server and the data-importer as Docker Compose applications on my Ubuntu Server VM, exposed only on my Tailnet.
I use Firefly to import a CSV of all my credit card transactions about once a month and run some reports on expense categories, basically as a way to catch surprise expenses and trends. I used to use it much more extensively, but found that this use-case has the best practical value.
I’ve found this service particularly valuable from a privacy perspective. Call me paranoid or old-fashioned, but I refuse to use any service that grants automated access to my bank accounts, e.g., Plaid. The benefit-to-consequence ratio of granting a mysterious third-party access to my financial accounts does not compute for me.
Joplin
Joplin is a note-taking app, with features similar to Evernote (at least circa 2016, as that’s the last time I used Evernote). I run the Joplin server as a Docker Compose application on my Ubuntu Server VM, exposed only on my Tailnet. The Joplin server acts as the source-of-truth storage and a synchronization mechanism between clients.
I’ve been a happy user of Joplin since late 2022. I originally picked it because the clients are performant and reliable, and because it has some features I found missing in other note-taking apps. For example, every note is just a markdown file, but it can also be edited in rich text format, and I can easily embed images and documents into a note.
Nextcloud
NextCloud is essentially a file server with features similar to Dropbox or Google Drive. I run the Nextcloud community image as a Docker Compose application on my Ubuntu Server VM, exposed only on my Tailnet.
I’ve mounted my TrueNAS as external storage, so I can access my TrueNAS files via Nextcloud. This seems redundant - why not just access the files via TrueNAS? The main value of Nextcloud in this setup is that the Nextcloud clients can cache files for offline usage. So I cache a subset of my TrueNAS files on my Macbook and iPhone for offline usage, e.g., my ebooks for flights.
Photoprism
Photoprism is a photos app with features similar to Google Photos. I run the server as a Docker Compose application on my Ubuntu Server VM, exposed only on my Tailnet.
I’ve mounted several directories from my TrueNAS into Photoprism as read-only CIFS volumes. This feature is surprisingly under-documented, or maybe I’m searching for the wrong keywords. I basically did what’s described in this blog post. In any case, this means my media files live on TrueNAS as plain old files in folders, but I still get the benefits of a fancy photo app (face detection, geo-tagging, AI search, etc.).
So far I’ve been very happy with Photoprism, but I’d also like to try Immich at some point.
Photosync
Photosync is a smartphone app for transferring photos and videos from a smartphone to a variety of backends. I have Photosync configured to automatically backup all photos and videos from my iPhone to my TrueNAS server. I mount the backup directory into my Photoprism server (see above), so that my iPhone photos and videos are automatically indexed and available in Photoprism.
I also still use iCloud to backup my photos, but I’ll probably turn that off once I’m close to the next iCloud storage tier.
Backups
Automated TrueNAS Backups
I run a 2014 Mac Mini with a 12TB external HDD using encrypted APFS to facilitate TrueNAS backups. I call it the Backmini.
Once a day, the Backmini runs a script that rsyncs all data from my TrueNAS to the external hard drive. Later in the day, it runs another script that backs up the hard drive using Backblaze unlimited personal backup.
This is not a standard TrueNAS backup strategy, but I designed it intentionally for two reasons:
First, I specifically want to have a local copy of all my data on an APFS encrypted drive. If something horrible happens to the TrueNAS, I can just plug the APFS drive to my Macbook and access a fresh copy of my data. If something horrible happens to me, my fiancé or family member can plug the APFS drive to a Macbook and access a fresh copy of my data.
Second, it’s the most cost-effective strategy I’ve found to backup the amount of data that I have (currently ~4TB with capacity for up to 12TB). I made a simple spreadsheet comparing the prices of backing up data over five years using my Backmini+Backblaze setup vs. Backblaze B2 vs. Amazon S3. I made the following assumptions for Backmini+Backblaze:
- Hardware: I paid ~$100 for the 2014 Mac Mini and ~$265 for the 12TB drive and its enclosure. I spread the hardware cost over five years, basically assuming that’s the lifespan of the hardware.
- Electricity: The system runs 24x7 at 15W for with rates at ~$0.48/kWh (🤯, see PGE pricing), totaling ~$63/year.
- Storage: I pay $99/year for the Backblaze personal unlimited backup plan.
For Backblaze B2 and Amazon S3, I used the current prices: $6/TB/month (B2) and $0.023/GB/month (S3).
The numbers look like this:
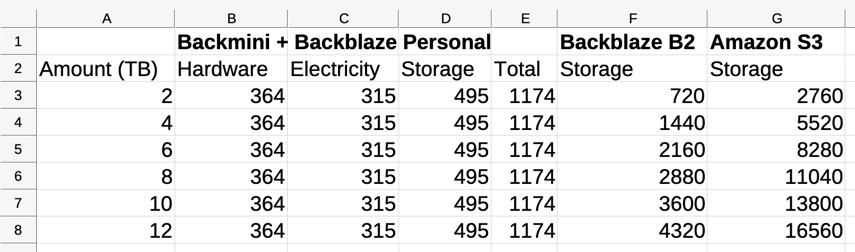
So the Backmini+Backblaze strategy becomes the most cost-effective somewhere between 2TB and 4TB of storage.
At 12TB it’s ~4x cheaper than B2 and ~14x cheaper than S3. In reality S3 would actually be even more expensive due to read and write fees, but I think the point is clear. If interested, here’s the spreadsheet: backup-pricing.ods.
Also note that I intentionally chose to run the rsync script on the Backmini, i.e., pulling data from TrueNAS to the Backmini’s external HDD. I did this to account for the case where either the Backmini or TrueNAS are compromised. If TrueNAS is compromised, the local data can be deleted, but there’s no TrueNAS user that can access the Backmini’s storage, so the backup is unaffected. If the Backmini is compromised, the local backup data can be deleted, but the Backmini user can only read from TrueNAS, so TrueNAS is unaffected. So an attacker would have to compromise both systems to delete all the data. In that case I still have periodic offline backups, see below. To make the permissions work, I added a TrueNAS user called backmini, added the user to the group of each user whose data needs to be backed up, and configured the directory permissions as 750, i.e., permitting the group to read and execute files. Now the backmini user can read each TrueNAS user’s data but can only write to its own data.
Because I’ve been burned by silent drive failures before, I use a program called DriveDX to run periodic SMART checks and send me the results.
While this setup works well for me, I’ll mention some cons:
- It’s complicated. It would definitely be simpler to just sync the data to S3.
- The external hard drive is a single point of failure.
- The Backblaze backup is encrypted, but I find Backblaze’s encryption scheme flawed. Specifically, I have to enter my encryption key in the browser just to browse the files. So I basically have to hand over the key and trust that Backblaze isn’t doing anything dumb with it. I would find it much nicer if Backblaze either didn’t encrypt file names or had separate keys for file name and data encryption.
- The 2014 Mac Mini is almost deprecated by Apple. It’s running Monterey and gets a security patch a couple times a year, but it’s not getting any new major releases. At some point I’ll probably upgrade to a 2018 or a 2020 M1 Mac Mini.
Manual TrueNAS Backups
Every three months I run a rsync script to copy the most important data from my TrueNAS onto an external hard drive. Then the hard drive goes back into a small safe. The hard drive uses encrypted APFS, so it’s useless to anyone without the key.
Proxmox Backups
I use Proxmox’s built-in backup functionality to backup the Proxmox VMs on my Beelink Mini PC to an internal 2TB SSD once/month. Similar to my TrueNAS backups, I have a script on the Backmini that rsyncs the Proxmox VM backups to the 12TB external HDD, which then gets backed up to Backblaze.
Docker Compose Application Backups
To backup my Docker Compose applications, I use a containerized script that I wrote called bdv2s3. This horrible name is short for “backup docker volume to S3”.
The container runs as a service in a Docker Compose application with all of the volumes that need to be backed up mounted as read-only. For example, if I have a Postgres service with a volume mounted for data storage, I’ll also mount the volume into the bdv2s3 container as read-only. I use labels to identify containers which should be stopped before a backup is started. On a configurable cron, the bdv2s3 container will stop all labeled containers, tar up the contents of its mounted volumes, restart the stopped containers, gzip the tar file, encrypt the tar file using a configurable key, copy the encrypted file to S3 (or any S3-compatible storage), and curl a configurable monitoring endpoint. All configuration is injected via environment variables.
When I need to restore the volumes, I download the backup file, decrypt it, untar it, and use a docker run command to write the data back to a local docker volume.
I guess it could be a bit more automated, but it’s all documented in the bdv2s3 readme.
I run the backups nightly and store them in a Backblaze B2 bucket with a lifecycle rule that deletes files 60 days after creation.
I’ve been using this since late 2022, and I’ve successfully restored backups several times, so I generally trust this setup.
While this setup works for me, I’ll mention some cons to consider:
- It requires stopping the services. This is a homelab, so I’m not concerned with a few seconds of downtime.
- At some point the volumes become too big to backup this way. So far my biggest backups are on the order of 3 GB.
- Some services make nuanced assumptions about the permissions of the data in the volume. So I occasionally have to do a bit of additional permissions surgery when restoring.
Monitoring
Uptime Kuma
I use a self-hosted service called Uptime Kuma for monitoring.
Like some of my other services, Uptime Kuma runs as a Docker Compose application, accessible via Cloudflare Tunnel. Unlike my other services, it’s running on a tiny VM in the cloud. I happen to be using cloudserver.net because I got a good deal: $10 / year for a VM with 1 CPU and 1GB memory. I’ll likely move it over to Hetzner when that deal expires. I chose to run it in the cloud so that it’s decoupled from any failures in my homelab.
I use two types of monitoring in Uptime Kuma:
- Push monitoring. The service or task that’s being monitored has to periodically request an endpoint on the monitoring server. If it doesn’t, the service or task is considered to be down.
- HTTP monitoring. Uptime Kuma periodically sends an HTTP request to a specific URL on the server being monitored. If the request returns an error, the server is considered to be down.
Here are some examples of alerts I have configured:
- Each of my servers has a cron task to request a push monitoring URL once every five minutes. If that URL hasn’t been requested in a certain amount of time, the server is down and I get an email.
- Each of my self-hosted services has an HTTP monitor that sends a request to the service every five minutes. If that request hasn’t succeeded in a certain amount of time, the service is down and I get an email.
- Each of my application backups is configured to send a request to a push monitoring URL each time it runs (typically once/day). If that URl hasn’t been accessed in a certain amount of time, the backup is down and I get an email.
Uptime Robot
I use a SAAS called Uptime Robot to monitor Uptime Kuma. I have a single HTTP monitor that periodically pings my Uptime Kuma server, just to make sure it’s still up. I would use Uptime Robot for everything, but the free tier is limited and I can get everything I need from Uptime Kuma.
Amazon SES
I use Amazon’s Simple Email Service to send email notifications from Uptime Kuma and any other self-hosted service with an SMTP email integration.
Like many things in AWS, it’s immediately obvious that this should work, but not immediately obvious how to wire it up.
The high-level summary is that you create an IAM user (i.e., the type with a secret access ID and key), grant the user permission to send emails via SES, send a confirmation email to yourself to “subscribe” to the emails, and set email-smtp.<region>.amazonaws.com as the SMTP host and the IAM ID and IAM key as the SMTP username and password.
Conclusion
So that’s my current setup. It’s not a particularly impressive amount of storage/compute/networking compared to some other setups I’ve seen, but I feel like I’ve done a good job of designing and building just enough to meet my requirements.
If you have questions/comments/suggestions, feel free to use the self-hosted comment system below, or join the Reddit thread.
Appendix
Why TrueNAS?
I first got interested in ZFS and TrueNAS after experiencing two incidents of data corruption.
In the first, I found ~100 photos that I had stored on Google Drive had been corrupted. This varied from small lines through the photo, to large swaths of the photo grayed out, to not being able to open the file at all. Luckily I had a backup of these particular files on an old external drive that I was planning to wipe. I doubt they were corrupted on Google Drive. It’s more likely they were corrupted at some point while transferring from my phone, to my computer, to Google Drive, etc.
In the second, I found an important folder was completely missing from an external hard drive. After doing some SMART tests, I learned the drive had some hardware failures, but there had been no warning of this in MacOS. Luckily I also had a backup in this case.
After these incidents I went down the rabbithole of preventing bitrot, detecting data corruption, etc.. ZFS seemed like the best tool for the job, and TrueNAS seemed like the most user-friendly implementation, so that’s what I used.
Why not TrueNAS Scale?
I chose TrueNAS Core over TrueNAS Scale because Scale performed extremely poorly with the built-in storage controller in my Microserver Gen8. I ended up buying a storage controller on eBay, which improved performance, but it also increased the power usage by about 10W. I wrote a summary about it on the old TrueNAS forums.
So far the only feature I’ve missed from TrueNAS Scale is the ability to natively connect to Tailscale. But using my Tailscale-connected router as a subnet router has been totally sufficient. I haven’t been able to notice any performance penalty compared to transferring directly over the LAN. To me that makes sense, as the packets traverse the router anyways. I haven’t felt myself wanting any of the fancier features of TrueNAS Scale (VMs, Docker containers, etc.). I actually prefer to keep this setup as simple as possible for reliability and security purposes.
Why not PFSense / OpenSense?
I actually ran PFSense for about six months but ultimately decommissioned it in favor of the GL.iNet router described above. PFSense was pretty easy to setup, but it also occasionally failed in mysterious ways, a couple times while I was traveling. This could have totally been hardware-related, but I just wanted something that I can set and forget. The PFSense subreddit also left a sour taste in my mouth on a couple occasions (example).
Update: 10/13/24
I’ve replaced the 2014 Mac Mini with a 2015 11.6” Macbook Air, purchased for ~$100 on Backmarket. My main reasoning for this is the built-in battery. For some reason the Mac Mini would lose power ~once every couple weeks, even when on the UPS. Rebooting it was a pain. Newer versions of MacOS let you login after reboot through the Screen Sharing app, but MacOS Monterrey doesn’t seem to have this feature. So anytime the Mac Mini rebooted, I would have to attach a USB keyboard and type in the password to get it started. I’m hoping that the Macbook Air, by virtue of having a built-in UPS, solves this problem.